This season pulls me back to the small moments that make Christmas feel real. The twinkle of lights, the scent of pine, and the soft hum of holiday tunes fill the room. I wanted a simple way to keep that warm feeling alive without a long to do list. So I pulled together 22 magical Christmas crafts you can actually finish and use. And yes, don’t miss craft #8, it spreads real holiday cheer.
Why this post now? I made it for people who love cozy, handmade touches but hate the chaos of big projects. If you enjoy making a little magic with family or on your own, this one’s for you. These ideas balance charm with practicality, so you can finish a project, not just start it.
What you’ll get is clear. 22 ideas that fit a range of styles, spaces, and budgets. Each craft comes with simple steps and a short list of supplies. You can adapt ideas for kids, pets, apartments, or tiny tables. There are decor pieces you can display, small gifts you can tuck under the tree, and table accents for a festive touch.
Here’s how to use the guide. Pick 1 or 2 crafts to begin. Gather a small basket of supplies and set a timer for 30 minutes. Work with a friend or a kid to make it faster and more fun. You’ll finish with pieces you can use right away and with a few new skills you can reuse next year.
Not every idea will fit every home. Some crafts need more time or space. That’s okay. You can pick the parts you like and mix them into your own mini project list. The goal is simple joy, not pressure.
Ready to start? Grab cocoa, look for spots in your home that feel bare, and pick your first craft. If you want quick wins, try craft #8 first and see how it sparks smiles. Share your progress in the comments so others can borrow your ideas.
Contents
- 1. Festive Paper Ornaments
- 2. Scented Cinnamon Ornaments
- 3. DIY Christmas Wreath
- 4. Glittery Snowflakes
- 5. Recycled Christmas Cards
- 6. Cozy Knit Stockings
- 7. Pinecone Santas
- 8. Holiday Mason Jar Gifts
- 9. Holiday-Themed Candle Holders
- 10. Glittery Pinecone Christmas Trees
- 11. Handprint Reindeer
- 12. Fabric Scraps Garland
- 13. Painted Rocks for Christmas
- 14. Felt Christmas Tree
- 15. Holiday Photo Frames
- 16. Snowy Pinecone Centerpieces
- 17. Christmas Cookie Decorating
- 18. Snowman Jar Lanterns
- 19. Christmas Tree Baubles
- 20. Holiday Themed Cross-Stitch
- 21. Christmas Village Display
- 22. Holiday Countdown Calendar
1. Festive Paper Ornaments


Festive Paper Ornaments
Want quick, colorful decorations you can make with the whole family? Festive Paper Ornaments turn scraps into a bright handmade display. They are simple, budget-friendly, and you can match your Christmas style exactly. Here is why this works for you: it’s easy, it sparks creativity, and you get lots of variety in one project.
What you’ll need
– Colorful paper scraps in festive patterns or solid colors
– Scissors and a glue bottle or glue stick
– Ribbon, string, or twine for hanging
– Optional templates or printable shapes to trace
Steps to make them
1) Pick shapes you like. Circles, stars, bells, and hearts work well. You can trace templates or freehand your own.
2) Cut 2 or more shapes from different papers to build a layered look.
3) Layer the pieces and glue them in place. Glue only the center so the edges stay flat and easy to see.
4) Make a hanging loop. Punch a small hole or fold a tiny tab at the top, then thread a ribbon or string.
Tips for a polished look
– Use double-sided paper or add a bold color on the back for a bright edge.
– Mix sizes and offset layers for depth.
– Add a tiny sparkle with a dab of glitter or a foil dot, but keep it light.
– Build a coordinated set by sticking to one color family or theme.
Display ideas
Hang ornaments on your Christmas tree, drape them along a garland, or tape a few to a window for sunlight to catch. They also look nice on a mantle or banister.
Care and storage
Let glue dry fully before packing. Store flat in a dry box to prevent curling. When you unbox them next year, they’ll be ready to shine again.
2. Scented Cinnamon Ornaments

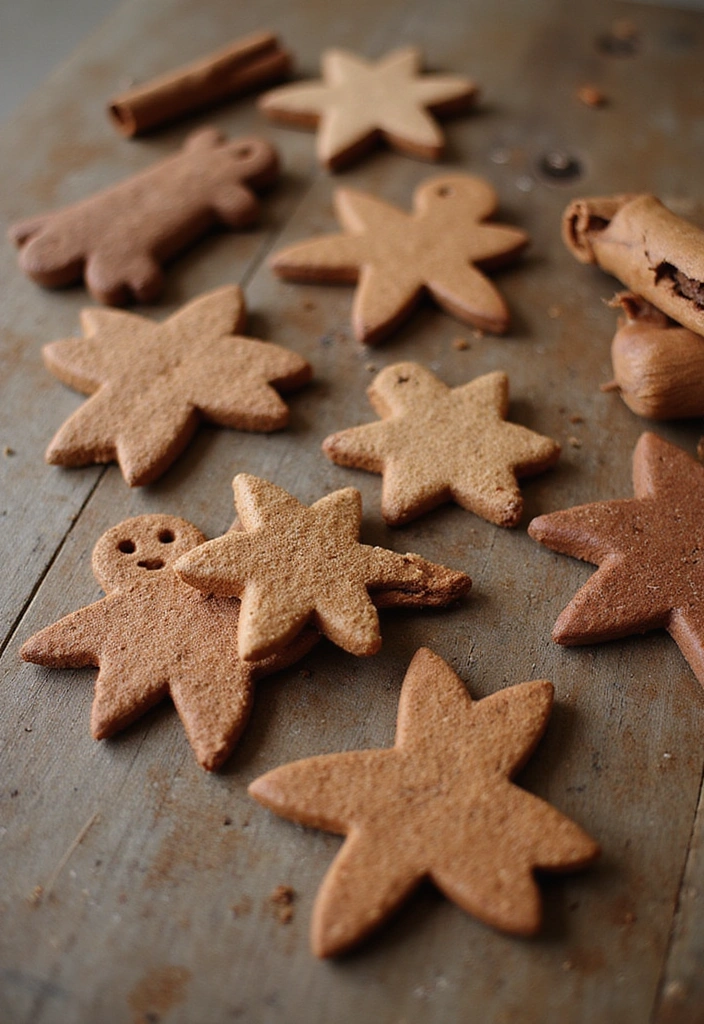
If you want a warm, homey smell during the holidays, try scented cinnamon ornaments. They are easy for families and create a cozy glow in any room. You get a kid-friendly craft and a natural aroma that lasts for days.
What you’ll need
– 1 cup ground cinnamon
– 1 cup applesauce
– 1 cup white craft glue
– Cookie cutters
– A drinking straw or skewer
– Ribbon or string for hanging
Here is why this works: the applesauce and cinnamon form a dough that dries hard. The scent stays long, and the shapes look festive on the tree or around the house.
1) In a bowl, stir together the cinnamon, applesauce, and glue until you get a firm dough. If it feels too sticky, add a pinch more cinnamon.
2) Dust your surface lightly and roll the dough to about ¼ inch thick. This keeps the shapes sturdy and easy to handle.
3) Cut shapes with cookie cutters. Place each shape on a tray and keep the dough for more cuts.
4) Poke a small hole at the top with a straw for hanging. Let all shapes dry in a warm, dry spot for 24 to 48 hours. Turn them once so they dry evenly.
Optional: you can add a touch of cloves or nutmeg for extra spice. Thread ribbon through the holes when dry and hang on the tree, in garlands, or in a sunny kitchen window.
Safety note: these are decorative and not meant to be eaten.
3. DIY Christmas Wreath
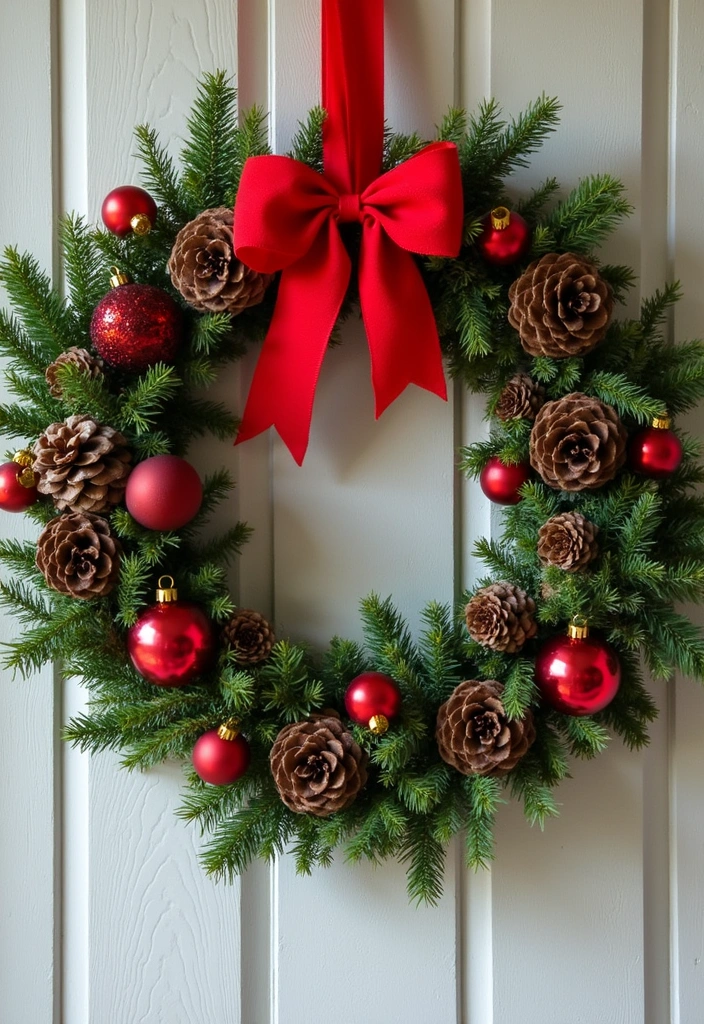
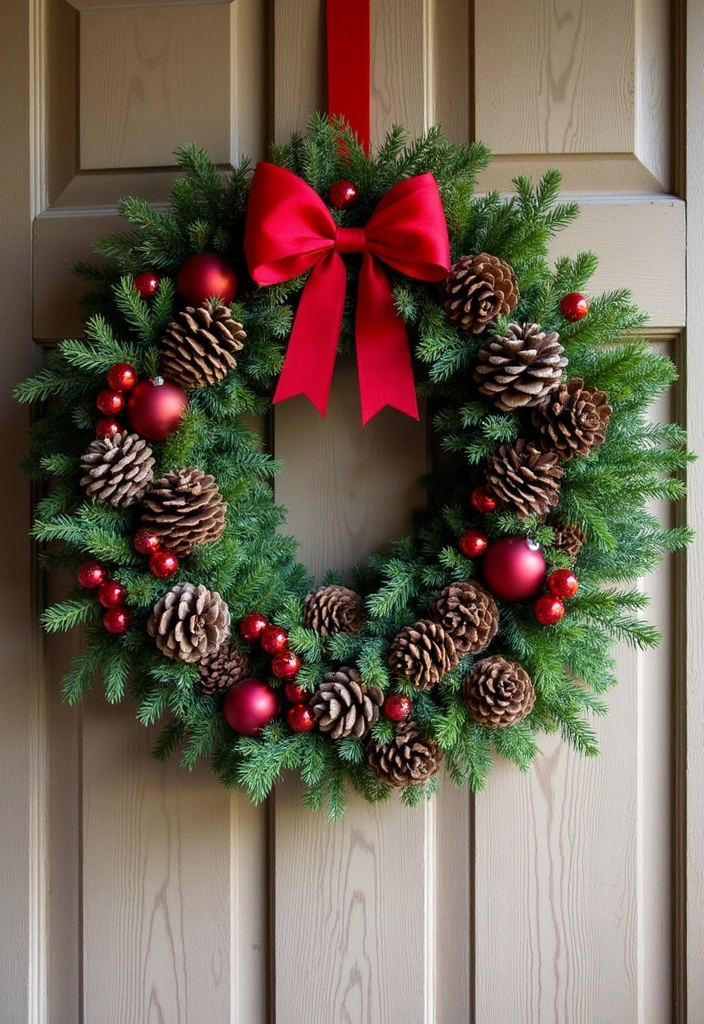
A handmade wreath on your front door says Merry Christmas in a warm, friendly way. You can craft one that fits your space, your style, and your budget.
1. Base choice: Start with a wreath form you trust. A grapevine base gives a rustic vibe; a foam ring keeps the look clean.
2. Materials: Gather pinecones, evergreen branches, red berries, festive ribbons, and a few small ornaments. The pine scent makes this feel like a holiday ritual.
3. Attach: Secure pieces with hot glue or floral wire. Layer greens to add depth.
4. Finish: Add a final touch that tells your story. A bold bow or a strand of lights adds color.
Hang your wreath on the front door to greet guests, or place it on a table as a festive centerpiece with a candle in the middle.
Tips:
– Outdoor use: choose weather-safe ornaments and seal glue with a light spray.
– After the season: store the wreath flat in a box and reuse pieces next year.
Next steps: Try color themes like classic red and green, elegant white and silver, or natural greens with bold textures such as eucalyptus.
4. Glittery Snowflakes
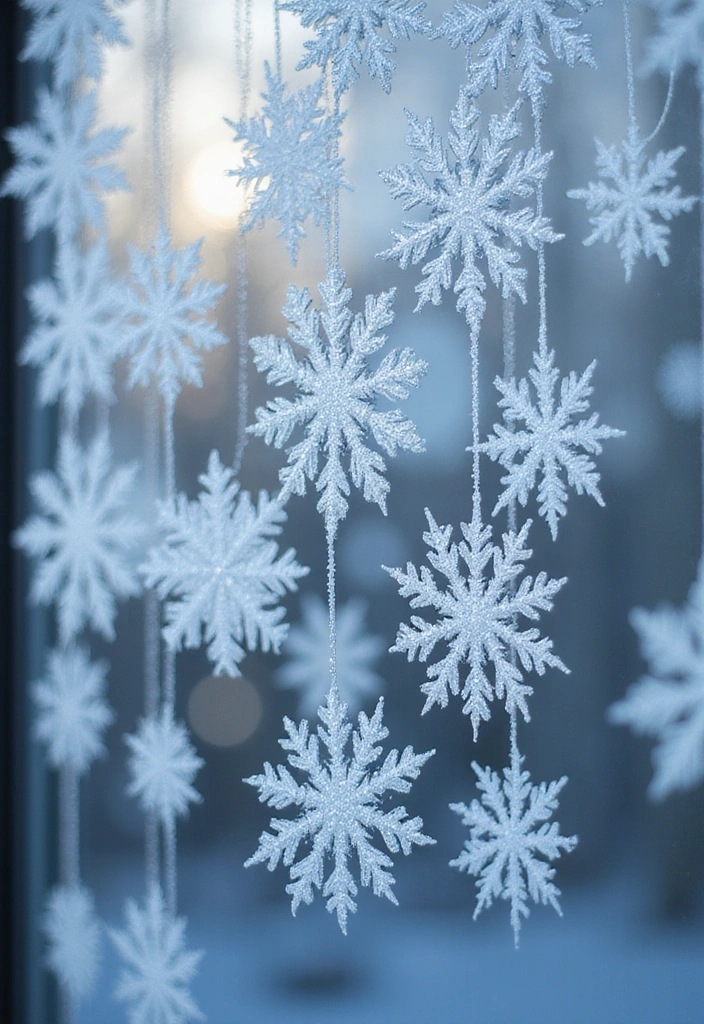

You want a quick, kid-friendly DIY craft that adds winter sparkle without a big mess. Glittery snowflakes fit the bill. They brighten windows, mantels, and your Christmas tree, and each one can look different.
Here is why they work: easy materials, fast drying, and room for creativity.
1. Cut snowflake shapes from sturdy cardstock. Vary sizes for a playful display.
2. Cover the surface with a glue stick. A thin, even coat helps the glitter stick.
3. Sprinkle glitter generously. Shake off the excess onto a tray or scrap paper.
4. Attach a string for hanging. Tie a small loop at the top so you can hang them later.
Let them dry completely before you hang them. This keeps glitter from shedding.
Where to use: windows catch light, mantels glow, and the tree sparkles. Try a string of several snowflakes for a dreamy winter scene.
Next steps: mix two glitter colors, or cut a few extra shapes in different patterns.
Tips: work over a tray to keep mess down. After drying, a light spray of clear sealant helps glitter stay put.
5. Recycled Christmas Cards
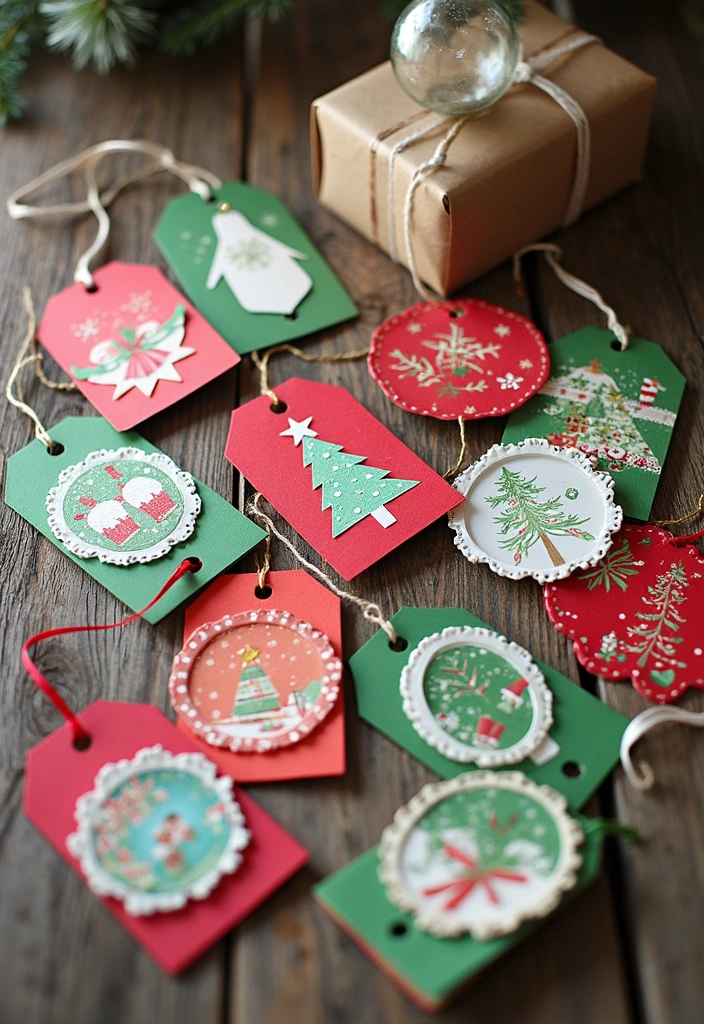
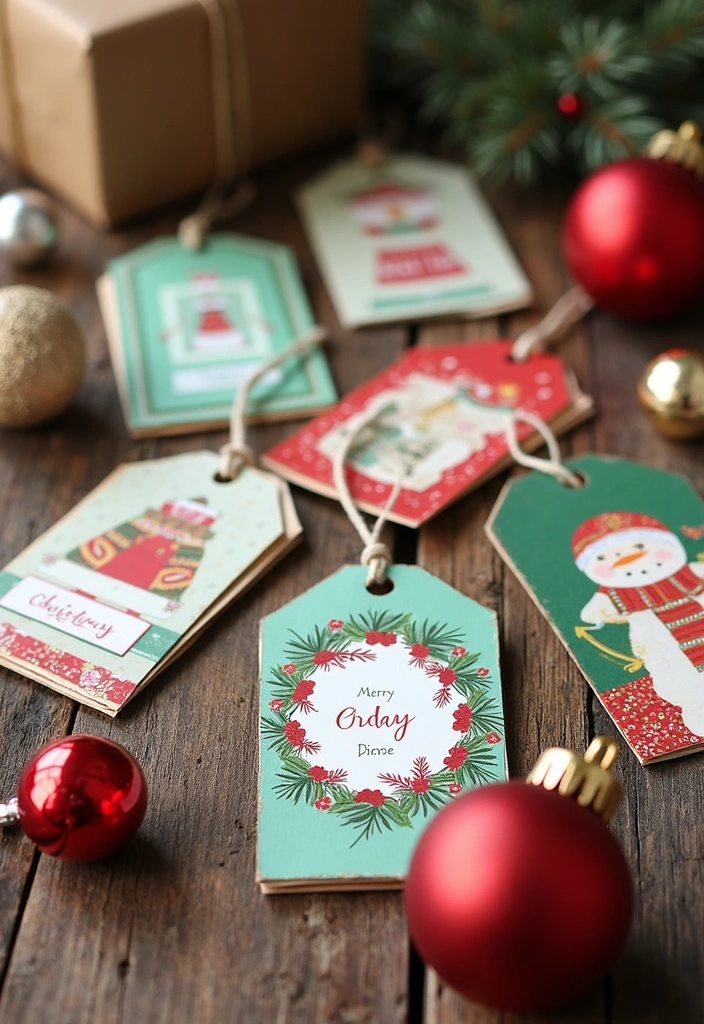
You likely have a pile of old Christmas cards. You want less waste and more meaning in your gift list. Reusing them is simple and rewarding. Here is why it helps your holiday season: it saves money, cuts clutter, and makes unique keepsakes.
What you’ll need
– Old Christmas cards
– Scissors
– A hole punch
– Ribbon or string
– Glue or tape
– Blank cards (optional)
Here is why this works. It turns memories into practical items people will use. It also sparks creativity with everyday materials. Now, let’s break it down into easy steps.
1) Gather your cards and tools. Pick colors and images that speak to you.
2) Cut out the parts you like. You can build a small collage or focus on a single image.
3) Add a hole only if you plan to hang the piece. A simple hole at the top makes a tag or ornament easy to carry.
4) Thread a ribbon or string through the hole. Tie it off so it won’t come loose.
5) Make new cards by gluing cut pieces onto blank folded cards. Keep the design simple and readable.
Tips for success
– Choose sturdy images that stay clear after cutting.
– Let kids pick pieces and help with safe scissors.
– This craft teaches recycling and creates personal gifts kids will love.
Next steps: use these tags on gifts, hang ornaments on the tree, or send one-of-a-kind cards this season.
6. Cozy Knit Stockings
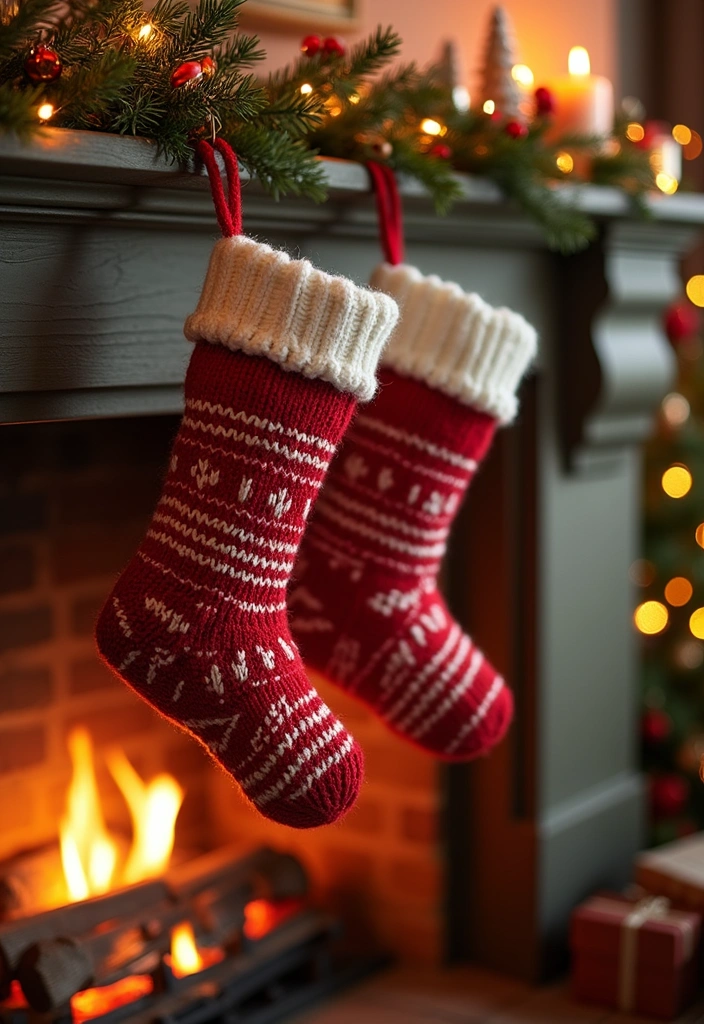
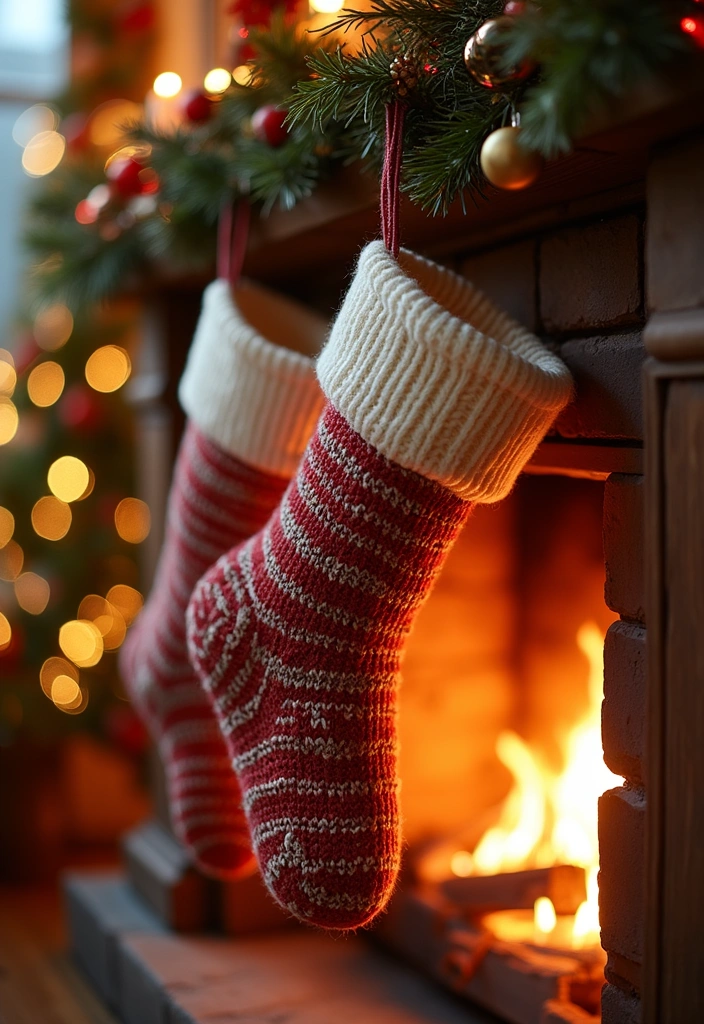
You want warm, welcoming decor that feels personal. Cozy knit stockings fit right in. They’re simple to make and can become a yearly family ritual.
Here is how to start and finish with flair:
– Color and yarn Pick your colors. Traditional red and green work well, but you can also try icy blue, cream, or forest tones. Choose soft, sturdy yarn so the stockings last for years.
– Shape and knit or crochet Create a basic stocking shape. Knit or crochet a simple cuff, a rounded heel, and a smooth toe. Leave a little space at the top for decorations and treats.
– Personalize Add names or tiny patterns. Embroider the name on the cuff, sew on felt letters, or stitch small motifs like stars or snowflakes.
– Details that pop Add a striped cuff, buttons, or a tiny bell. A puff of faux fur or a sparkly thread makes it feel festive.
– Hang and fill Attach a sturdy loop so it stays put. Hang them on the mantel, stair rail, or tree branch. Fill with candies, notes, or small surprises.
– Make it a family tradition Invite kids to help cut, knit, or sew. Over the years these stockings become keepsakes you treasure.
These stockings stay soft and bright for years. They become a warm family keepsake you pass down.
7. Pinecone Santas
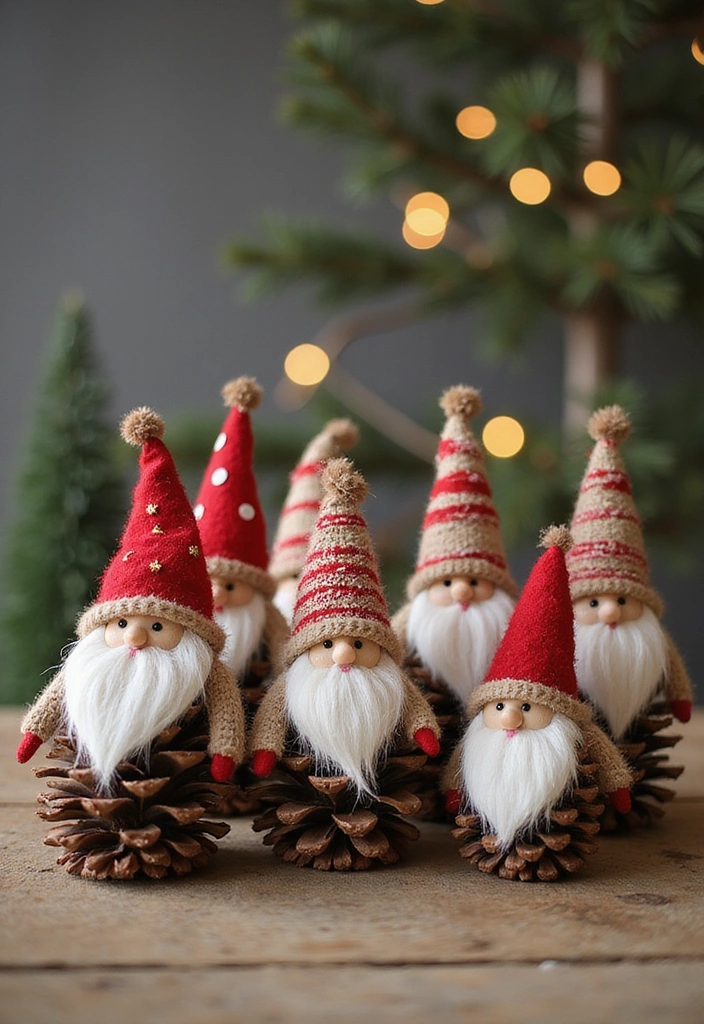

If you want a warm, kid-friendly Christmas project that doubles as decor, try Pinecone Santas. They’re simple, rustic, and fun to make together.
– What you need
– Large pinecones, clean and dry
– White craft paint
– Red felt or fabric scraps
– Small beads or buttons for eyes
– A tiny pom-pom for a nose
– Glue, scissors, and a short ribbon for hanging
– Step 1: prep
Collect pinecones outdoors. Pick the biggest ones you can find. Let them dry if they feel damp. Wipe off dirt with a cloth.
– Step 2: beard and hat
Paint the cone’s top white to form the beard. Let it dry. Glue a small red felt hat on top. A little brim adds charm.
– Step 3: face details
Attach two beads or buttons for eyes. Glue the pom-pom on the tip for a cute nose.
– Step 4: finish
Tie a ribbon loop if you want to hang it. Or place the Santa on a mantel, shelf, or table.
Practical reminders: let kids help with painting and gluing, but you handle the glue and any hot glue gun if you use one. Store finished Santas in a cool, dry place so they stay neat.
8. Holiday Mason Jar Gifts


Want a quick, warm gift that fits in a jar? Mason jars make it easy. They look festive and travel well. You choose what goes inside and what note you add.
Here is why this idea works for the holidays: you can tailor each jar to the person, and a little jar of cheer goes a long way.
– 1. Pick the jar size An 8-ounce jar works for a small treat. A 16-ounce jar fits a bigger mix or a couple of layers.
– 2. Edible gift ideas Layer hot cocoa mix with mini marshmallows. Add dry cookie ingredients in neat colors. Or make a brownie mix with flour, cocoa, sugar, and chips. Include a small spoon for stirring.
– 3. Decorative layers For a non edible look, layer colored sugar with tiny ornaments or fake cranberries. You can also add dried orange slices and a cinnamon stick for a warm scent.
– 4. Finish with a personal touch Top with a festive ribbon and a handwritten tag. Tell the recipient how to finish the mix, like “add hot water and a splash of milk.”
Store in a cool, dry place. These jars stay fresh longer when kept away from moisture. They make thoughtful gifts for friends, family, or coworkers, and they add a cozy, DIY touch to your holiday giving.
9. Holiday-Themed Candle Holders
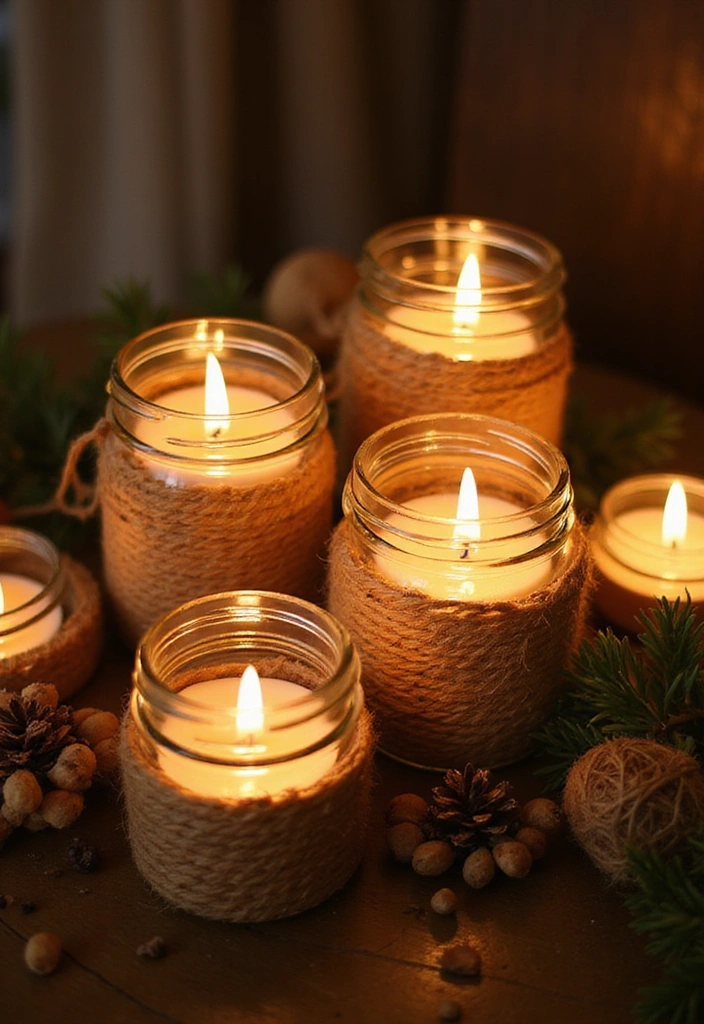
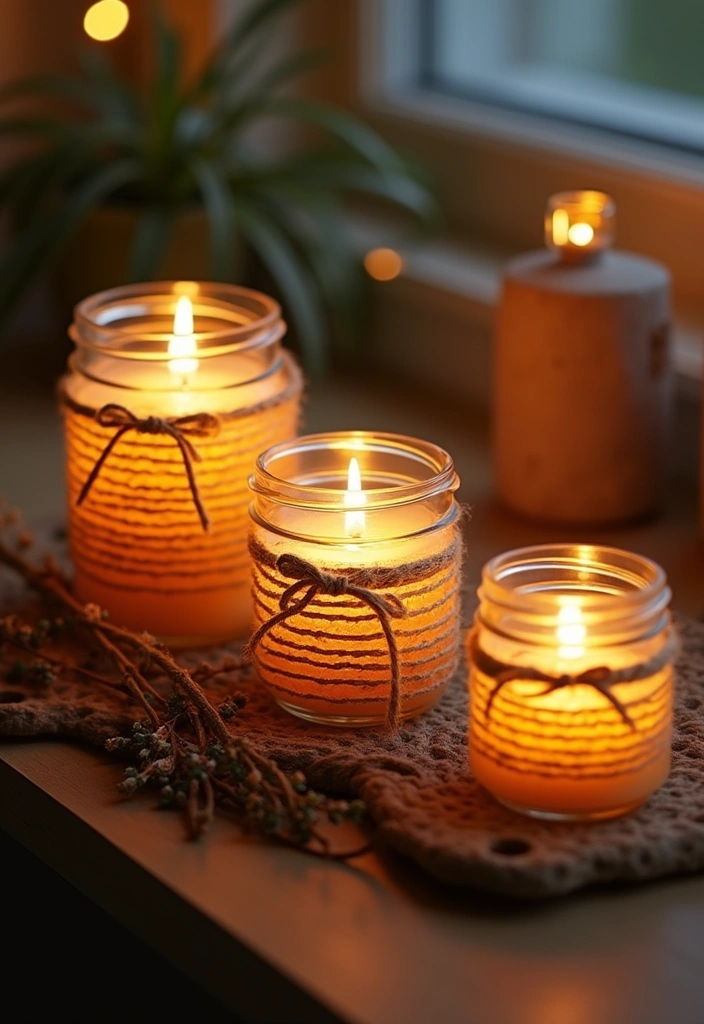
Cozy, festive glow you can make at home
Want more warmth in your holiday space without a big project? Holiday-themed candle holders pull the room together with soft light and simple style. You can use glass, wood, or clay. Pick what you have and give it a fresh coat of charm.
What you’ll make
1) Take an old glass jar and wrap it with twine or burlap for a rustic look. Let a touch of natural yarn show through.
2) Decorate with natural elements like pine needles, berries, or cinnamon sticks. Secure them with a dab of glue so they stay put.
3) Place a small candle inside and light it to create a gentle, inviting glow. If you want extra safety, use a flameless LED candle.
4) Make a few and group them together for a centerpiece. A trio or five jars on a tray adds warmth to a table or mantel.
Helpful tips for best results
– Use soft colors and textures that match your decor.
– Keep flammable decorations away from the flame or LED base.
– Try different materials: a wood slice under a jar or a clay holder with carved snow ideas.
These candle holders bring a cozy mood to family meals or quiet evenings by the fire. They’re easy to adjust for any room and any style.
10. Glittery Pinecone Christmas Trees


Looking for a simple, friendly craft that brightens your space this holiday season? Glittery Pinecone Christmas Trees bring color, texture, and a touch of the outdoors inside. They’re easy for kids and make a charming gift.
Here is how you make them:
– Gather pinecones of different sizes from your yard or a park. Dry them well and shake off dirt.
– Choose a sturdy base, like a wooden disk or a thick cardboard circle. This keeps the stack steady.
– Color options: spray paint the cones in red, green, gold, or silver. Or keep a natural look and coat them with glue, then sprinkle with fine glitter.
– Build the tree: glue the largest cone to the base, then stack smaller ones on top. Let the glue set before adding the next layer.
– Add a topper and tiny accents: a star, a bead, or a small bow. You can wrap a slim ribbon around the stack for extra charm.
– Finish with a sealant so glitter stays put and colors last longer.
– Display ideas: mantels, tabletops, or use as a festive gift topper. A small group works as a mini forest.
Next steps: try a batch and share a few with neighbors or teachers.
11. Handprint Reindeer

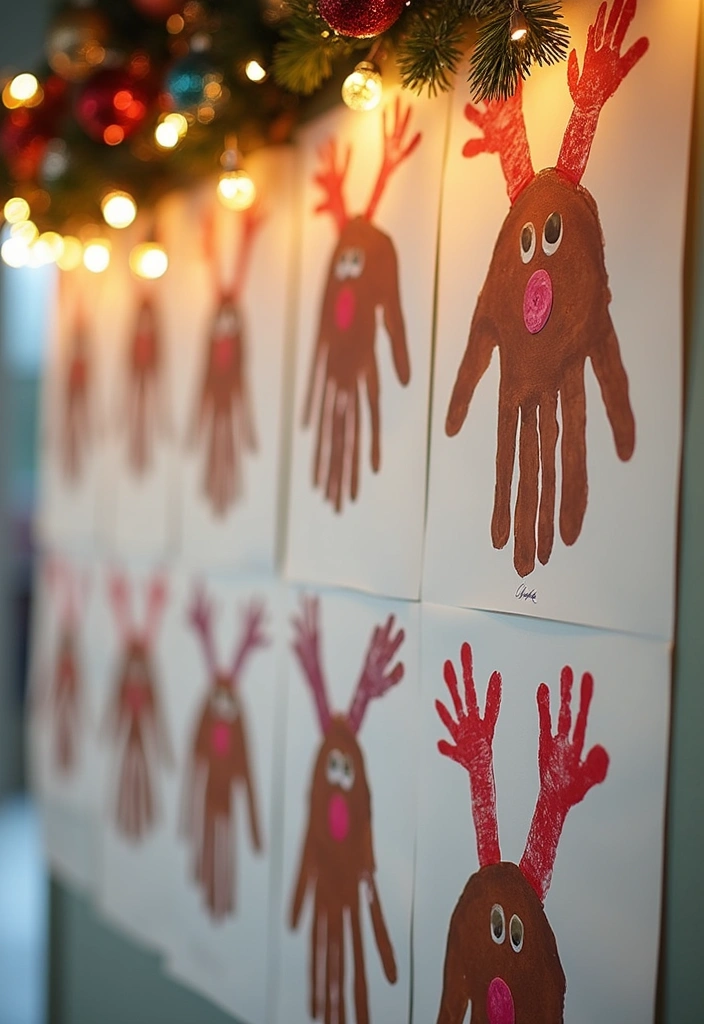
Handprint Reindeer craft is a simple, heartwarming project you can do with kids. It becomes a keepsake you will treasure each Christmas. Your child will enjoy the mess and the final gift you can display.
Materials
– Brown construction paper as the base
– Brown paint
– Your child’s hand
– Googly eyes
– Red pom-pom for the nose
– Glue
– Optional: extra brown paper for antlers or a marker for tiny feet
Steps
– Paint your child’s hand with brown paint.
– Press the painted hand onto the paper to form the reindeer body.
– Add eyes with glue and place a red pom-pom nose.
– Optional finish: cut two brown shapes for antlers and glue them on top, or draw tiny feet with a marker.
Tips for success
– Practice on scrap paper first so you know where to place the hand.
– Tape the base down to keep it steady while you work.
– Use washable paint for easy cleanup.
– Let paint dry flat before moving to the next step.
Let the piece dry fully before you hang it or gift it. The result feels warm and personal, a true keepsake that family members will treasure.
Next steps: try different colors, or turn a set into a small team of reindeer for a festive wall display.
12. Fabric Scraps Garland


You want a cozy Christmas touch you can make at home. Fabric scraps turn junk into cheer, fast and cheap. This project is kid-friendly and adapts to your style.
What you’ll need
– A mix of fabric scraps in red, green, gold, and other festive patterns
– Twine or jute, about 6 to 8 feet long
– Scissors, a ruler, and a needle or a dab of fabric glue
– Optional extras: buttons, bells, ribbons
How to make it
– 1. Gather scraps that feel like the season and fit your decor.
– 2. Cut strips about 6 to 8 inches long and 1 inch wide.
– 3. Tie each strip to the twine with a simple knot. Alternate colors for a lively look.
– 4. Space the knots evenly and adjust so the garland sits straight.
– 5. Add a few accented pieces, like a button between knots or a tiny bow.
Display ideas
– Drape the garland over the fireplace, along a staircase, or on a wall.
– Use it to frame a door or a photo corner for a warm backdrop.
Why this works
– It recycles scraps and adds texture.
– It changes mood with color and pattern choices.
Tips and variations
– Choose scraps in the same color family for a cohesive look.
– For a shorter garland, tie fewer strips.
– Try plaid, velvet, or metallic scraps for a modern twist.
– Store flat in a box to keep colors bright.
13. Painted Rocks for Christmas
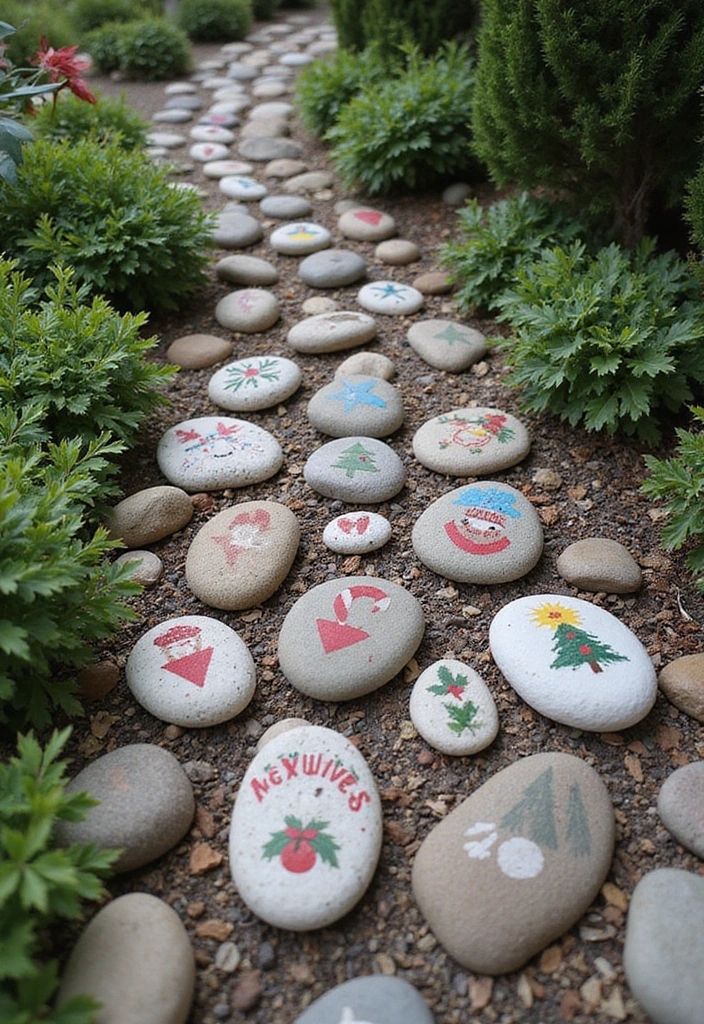
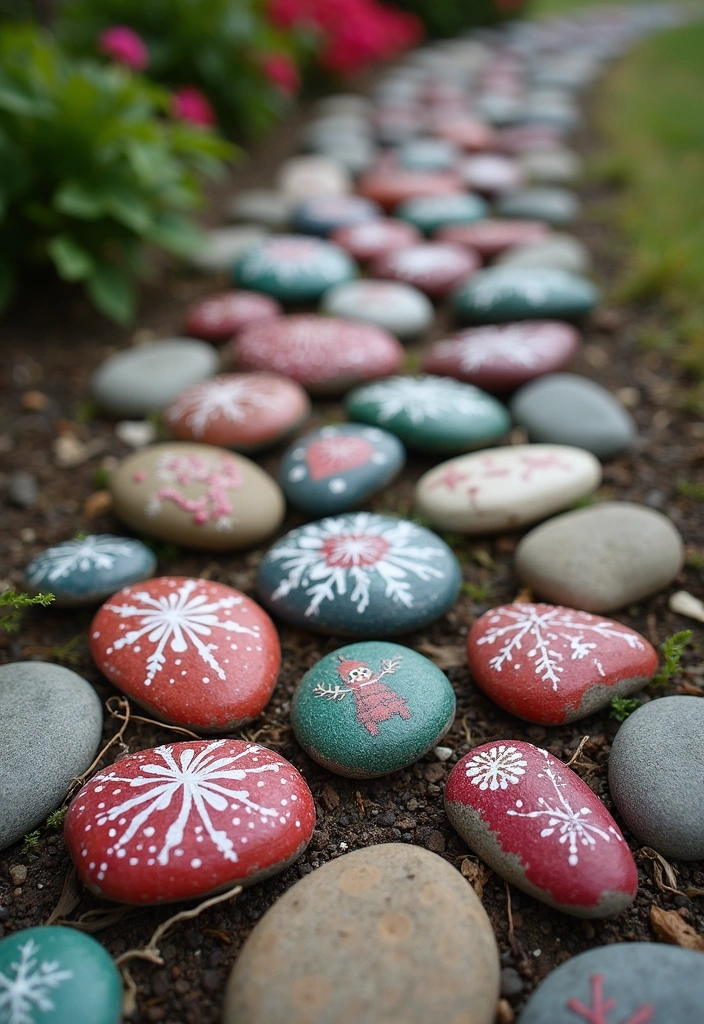
Want a quick craft that spreads Christmas cheer outside? Painted rocks for Christmas are perfect. They add a touch of whimsy to your yard, porch, or path and are easy to share with neighbors.
Here is why this works. They are small and low-cost. You can finish a batch in an afternoon. A clear sealer helps them last through rain and sun.
1. Gather smooth rocks from your yard or a local park.
2. Clean and dry them so paint sticks well.
3. Paint festive designs with acrylics—Santa, snowman, Christmas trees, candy canes, stars.
4. Let colors dry, then spray with a clear sealer for extra durability.
5. Place them in garden beds, along a path, or near the porch to greet guests.
What you need
– smooth rocks from yard or park
– acrylic paints in Christmas colors
– small brushes and a sealer spray
– a clean workspace
Tips
– Allow each coat to dry fully before adding the next.
– Use weather-resistant sealer for longer life outdoors.
– Start with a small batch, then add more as you like.
Next, you can turn these rocks into a neighborhood gift. Hide a few around your block so others can find them. Include a tiny note inviting finders to share a photo or tag your area.
Next steps:
– Choose six rocks and two simple designs.
– Set aside an afternoon for painting.
– Display some outside and hide a few for a friendly rock hunt.
14. Felt Christmas Tree

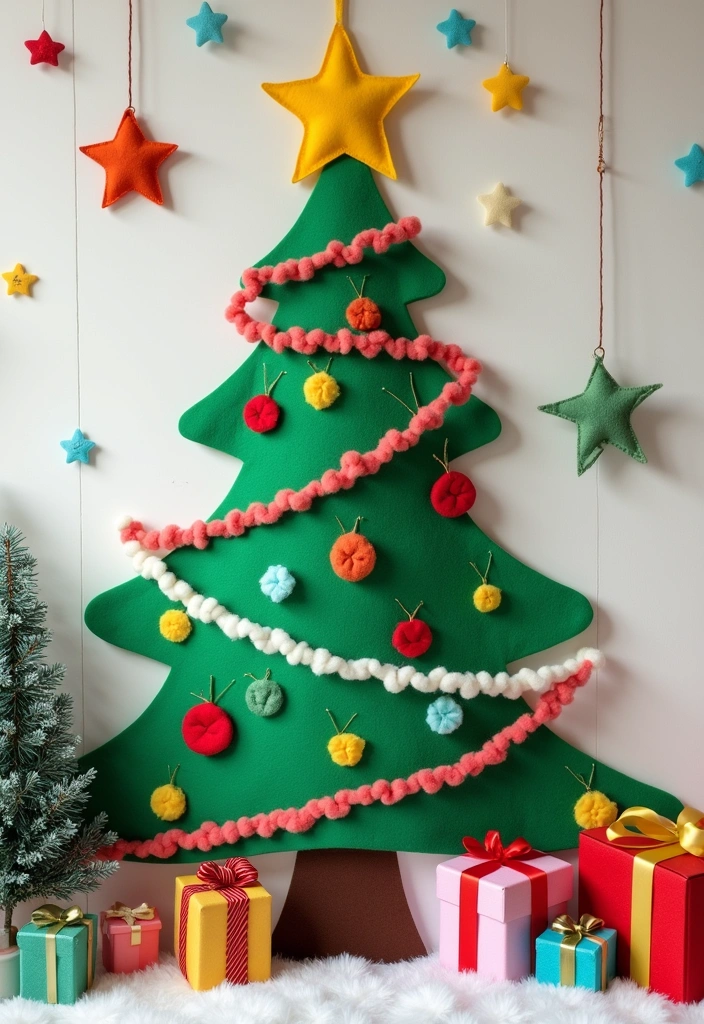
If you want a safe, repeatable Christmas craft that kids love, try a felt Christmas tree. It stays tidy, and there are no fragile parts to break.
1. Cut a large green felt triangle for the tree and a brown felt trunk.
2. Decorate with colorful felt ornaments, stars, and garlands that Velcro on and off so little hands can swap them easily.
3. Secure the trunk to the tree with fabric adhesive.
4. Hang it on a wall or prop it in a holiday display.
This soft project invites hands-on fun without mess. With your child, you can plan a new look each year and turn it into a simple tradition. The felt pieces feel good in tiny fingers as they press ornaments into place.
Tips for more joy
– Choose brighter greens or add a felt garland in a color you love to fit your decor.
– Keep a small box of extra ornaments so you can refresh the scene after a few weeks.
– Store the tree flat when not in use to save space.
Next steps: pull out the tree, try a new color scheme, and enjoy a fresh holiday scene together.
15. Holiday Photo Frames
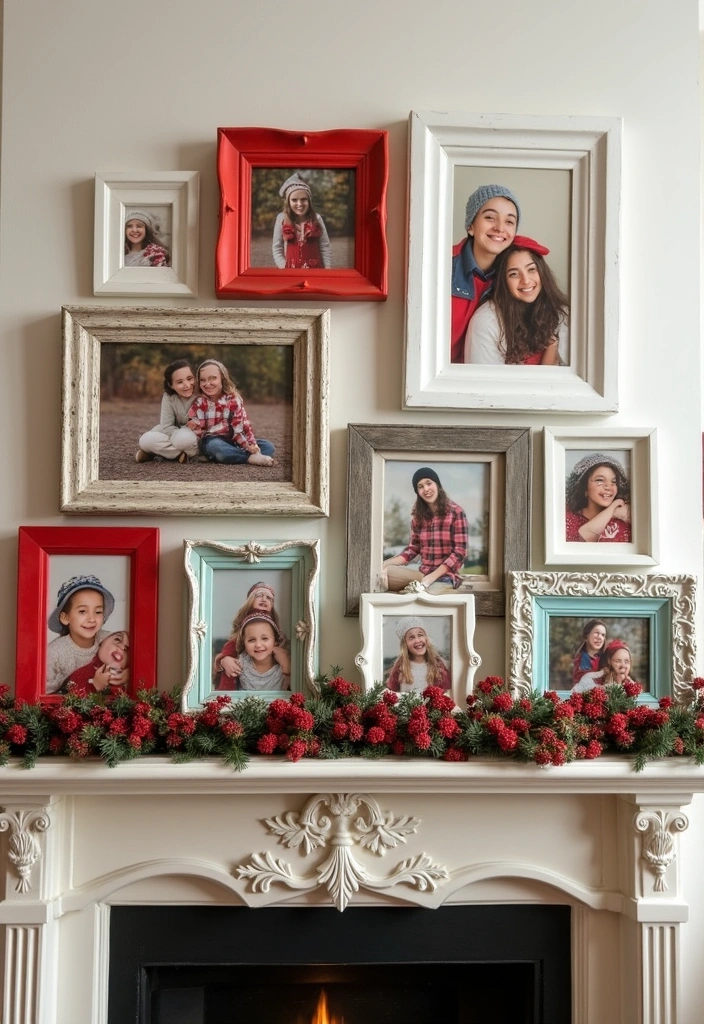
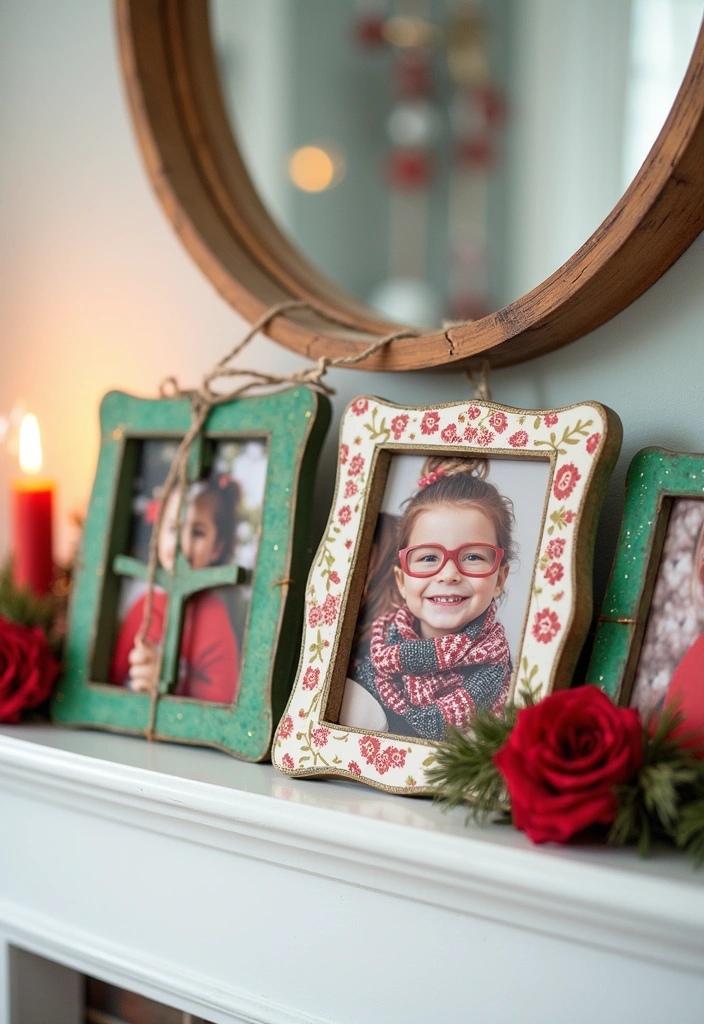
If you want to keep holiday smiles close, try DIY Holiday Photo Frames. They brighten shelves and are easy for kids to help.
Here is why they shine: you can pick colors, add names, and swap photos each season.
Next steps: gather supplies, decorate, and start with a small set.
Materials you’ll need
– Plain wooden or cardboard frames
– Acrylic paints and brushes, plus a sealant
– Ribbons, stickers, and festive paper
– Markers to write names and dates
– Photos that fit your frame size
Steps to craft your frames
1) Clean the frames. Wipe away dust.
2) Paint a base color. Let it dry.
3) Decorate with ribbons or stickers. Try candy cane stripes.
4) Personalize with names and dates. Write neatly.
5) Insert your photos and seal the surface. Let it dry.
Design ideas
– Red and green for a classic look
– Icy blue with silver for a wintry vibe
Tips for best results
– Use photo corners for swapping
– Print photos in 4×6 or 5×7
– Choose acid-free mats to protect photos
Gift and display ideas
– Wrap frames with a bow for a gift
– Create a small mantel gallery
Common questions
– How many frames to start with? Three to six is a good starter set
– What photos look best? Clear, well-lit shots
Next steps
– Gather supplies and start this weekend
16. Snowy Pinecone Centerpieces
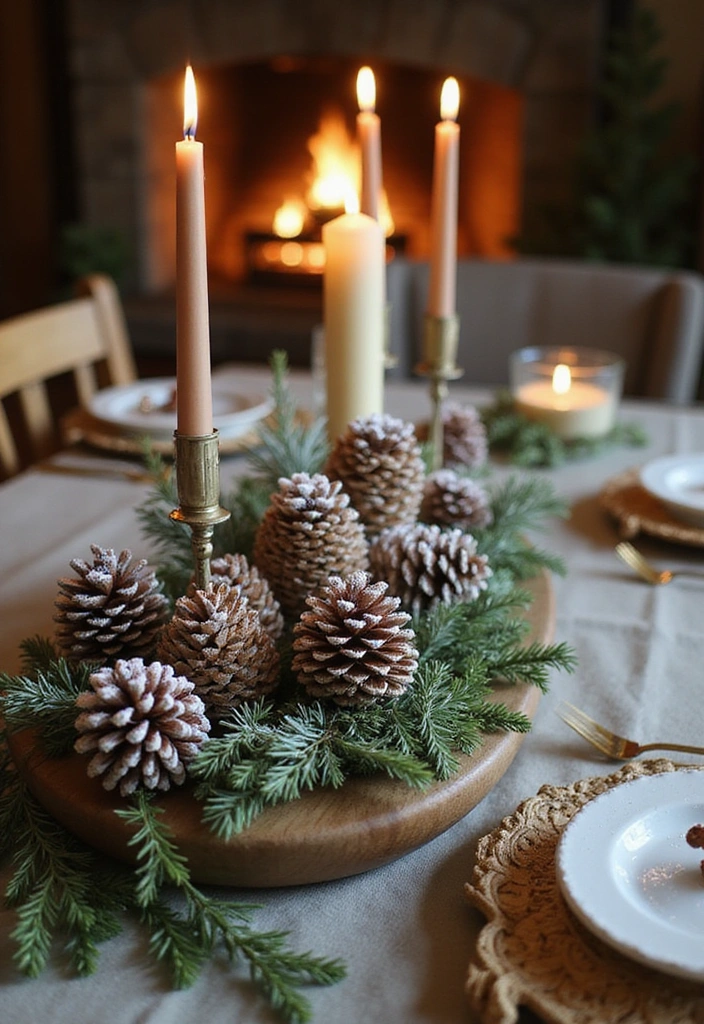
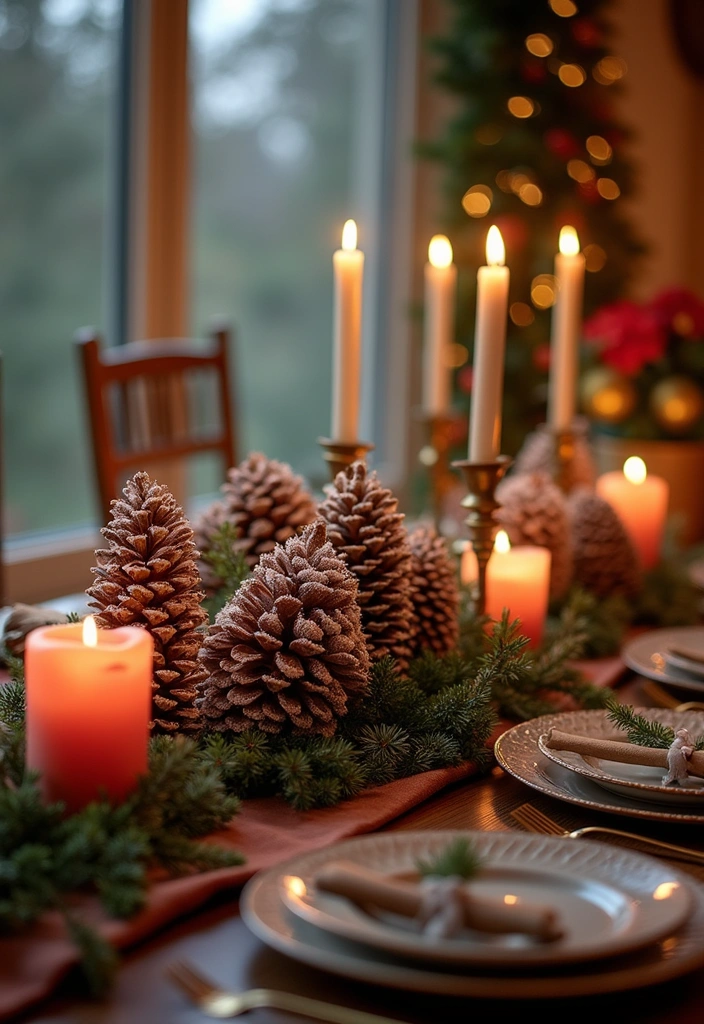
Need a quick, cozy centerpiece that brings the outdoors inside your home. A snowy pinecone centerpiece does the job in minutes. It adds a winter glow to your holiday table and costs little. You get texture, scent, and charm in one simple display.
Here is why this works. Pinecones bring natural texture to any table. White paint creates a frosty, magical look. Evergreen sprigs and berries add color and life. LED candles give warmth without a real flame.
Materials
– Pinecones of different sizes
– White spray paint or snow spray
– A decorative bowl or platter
– Artificial snow, evergreen sprigs, berries
– Small LED candles or tea lights
Steps
1) Gather pinecones of different sizes and dust them with a light coat of white paint to imitate fresh snow.
2) Arrange the cones in a shallow bowl or on a flat platter for a low, cozy base.
3) Tuck in evergreen sprigs and a few red berries for texture and a holiday pop.
4) Place a handful of LED candles around the rim or in the center for soft, inviting light.
Finish with a simple runner or a sprinkle of extra snow for a complete winter tablescape. This centerpiece is easy on the budget and easy to reuse for other gatherings.
17. Christmas Cookie Decorating


Cookie Decorating Station
Here’s a cozy trick to turn a baking session into art. Christmas cookie decorating lets you eat the result and share joy.
Colorful cookies make kids feel proud, and they brighten any cookie tin.
If you run low, bake more shapes fast.
Start simple, then add little details.
– Bake a batch of favorite shapes. Try gingerbread men, Christmas trees, and stars.
– Mix royal icing in a few colors. Red, green, white, and gold shine on the cookies.
– Use piping bags or squeeze bottles. Start with easy lines and dots, then try tiny details.
– Add toppings with sprinkles, edible glitter, and candies. Set out several toppings so every kid chooses their look.
Next, let the cookies cool completely before you decorate. Work from big shapes to small details. Keep sections neat and let kids lead with bold colors.
Place a dozen in a festive tin for neighbors, teachers, or friends.
Here is why it helps your holiday spirit: a craft and a treat.
Next steps: set up a decorating station, lay parchment, and pre-fill bags.
Tips: keep icing smooth but not runny. Use a toothpick to fix tiny mistakes. Let everyone show their own style.
Note: you can freeze undecorated cookies for later or decorate now and store in tins.
18. Snowman Jar Lanterns
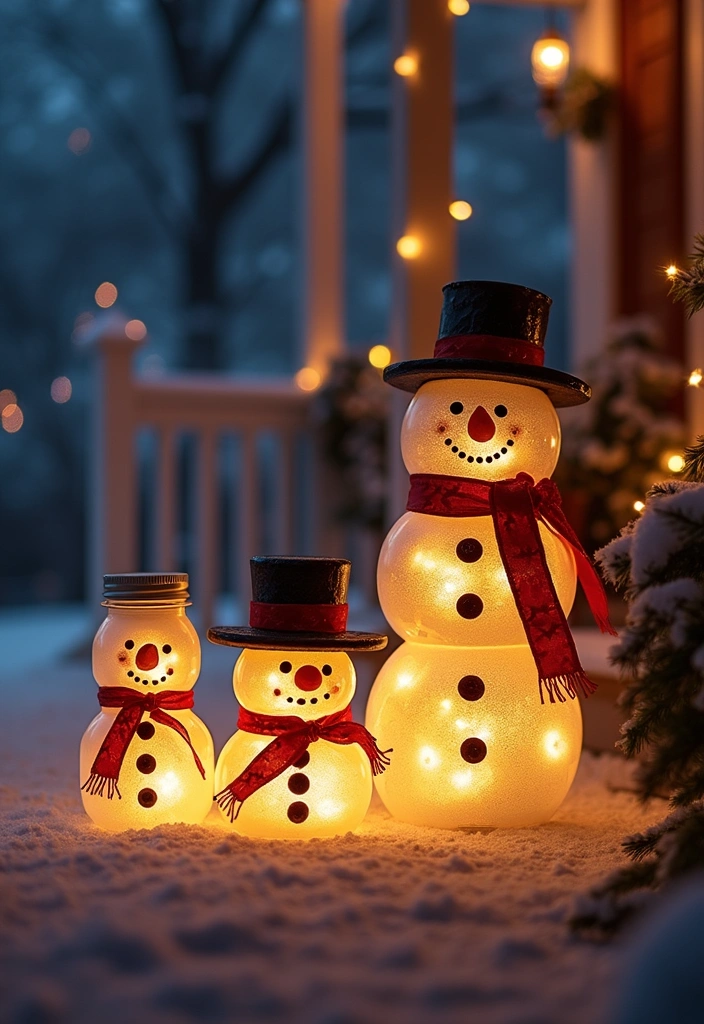
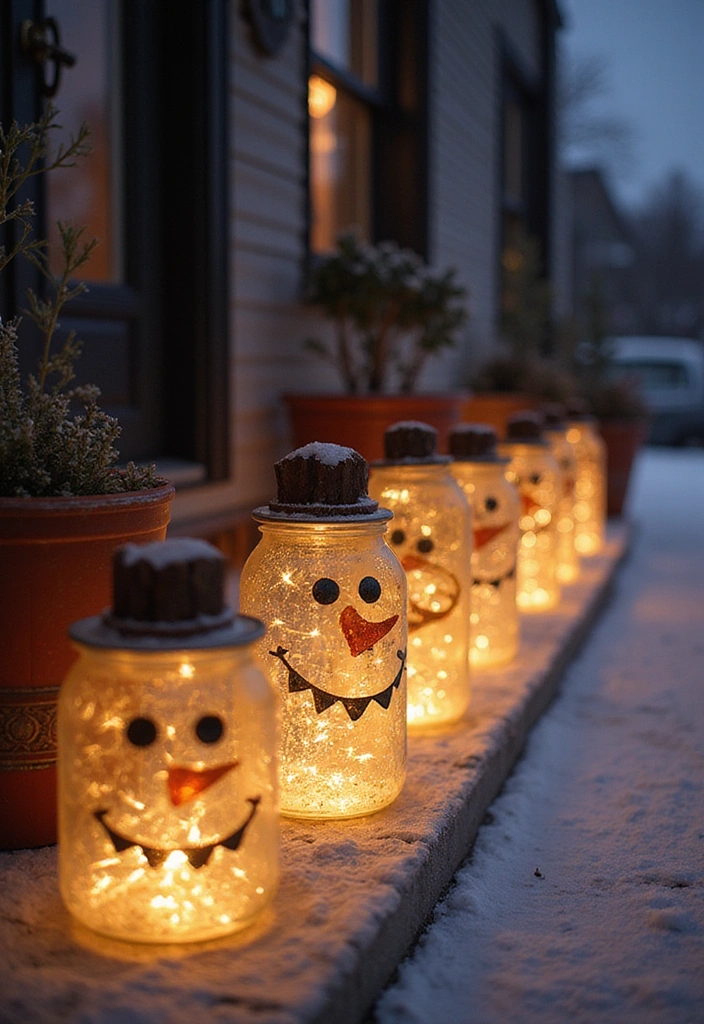
Looking for a warm, easy project that lights up your space? Snowman jar lanterns give a soft glow with almost no effort. This DIY craft fits just right for you and your family when you want a quick holiday decor win.
What you’ll need
– Clear jars
– White paint
– Black marker or paint for eyes and buttons
– Orange marker or paint for the carrot nose
– Tea lights or string fairy lights
– Scarf, hat, or ribbon for the top
Here is how you do it.
1. Paint the jar white in a smooth coat. Let it dry.
2. Add two eyes and three buttons with black. Draw a smiling mouth and a carrot nose in orange.
3. Place a tea light or a string of lights inside the jar.
4. Top it with a scarf, hat, or a colored collar around the rim.
Next, place and enjoy. You can show these lanterns on a windowsill, mantle, table, or entryway. They also look nice outside on a porch or steps.
Tips to boost charm: add a tiny smile, a sprinkle of glitter, or swap hats to make a family of snowmen in different colors.
Safety note: use LED lights for kids and outdoor use. Never leave lit candles unattended.
These little lights bring a soft, wintry feel to your room. It’s a quick project that lights up your holiday nights.
19. Christmas Tree Baubles

You want Christmas decorations that feel personal and easy to make. DIY Christmas tree baubles let you add your own story to every ornament. They’re simple to assemble and safe for family fun. Here is why this approach works and how to do it.
Next steps to craft your own look:
– 1. Choose a fillable bauble
Select clear plastic or glass baubles with a hollow center. They’re affordable and let you see the inside sparkle. Make sure the cap seals well so you can fill and carry them without leaks.
– 2. Add color and texture
Fill with glitter for a touch of sparkle, faux snow for a wintry feel, tiny beads, or colorful ribbons. You can layer different materials for depth. A single color theme looks clean, or mix hues to match your tree.
– 3. Insert a tiny surprise
Drop in small charms or beads, or tuck a folded note with a holiday wish. Keep the contents light so they settle nicely at the bottom and don’t rattle when you hang them.
– 4. Seal and hang
Seal with a dab of clear glue if needed, then hang with ribbon, twine, or a slim metal hook. Store extras in a box so they stay ready for next year.
With each bauble, your tree tells a new little story. Personal, charming, and ready to glow.
20. Holiday Themed Cross-Stitch
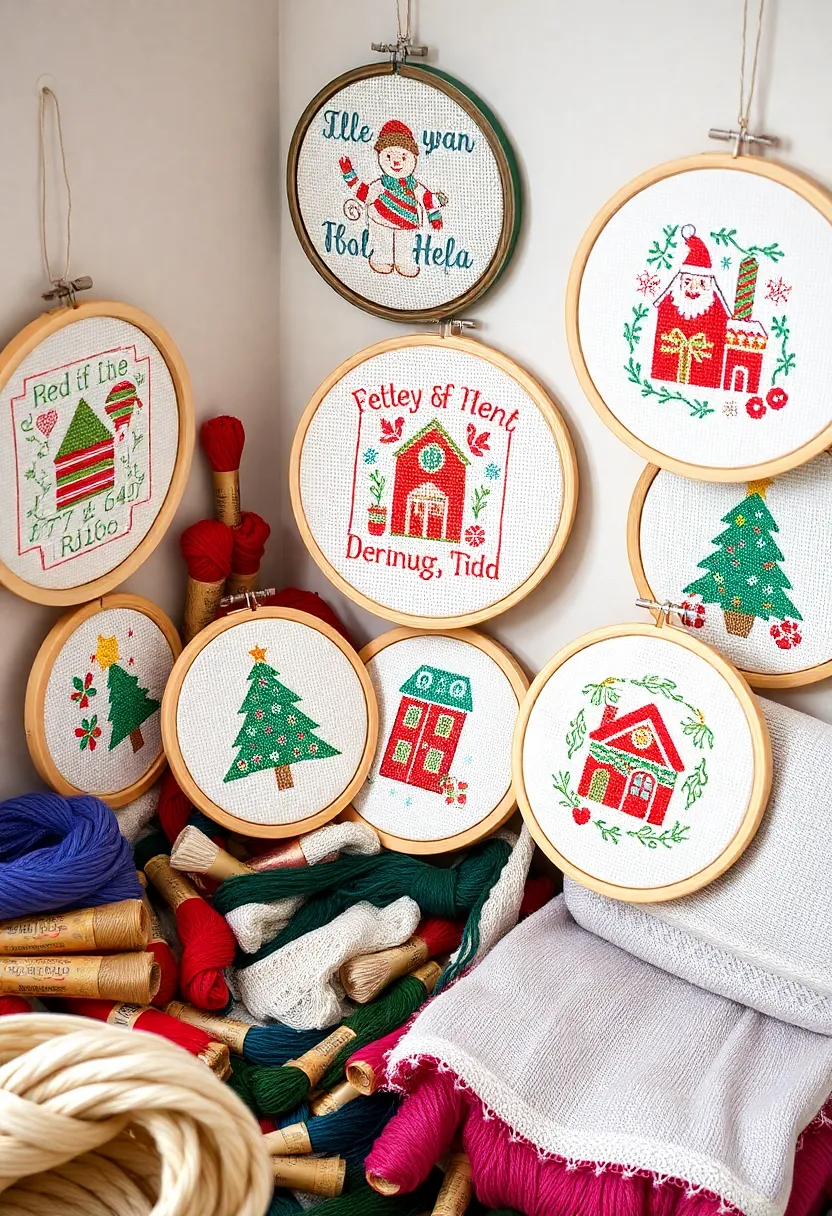
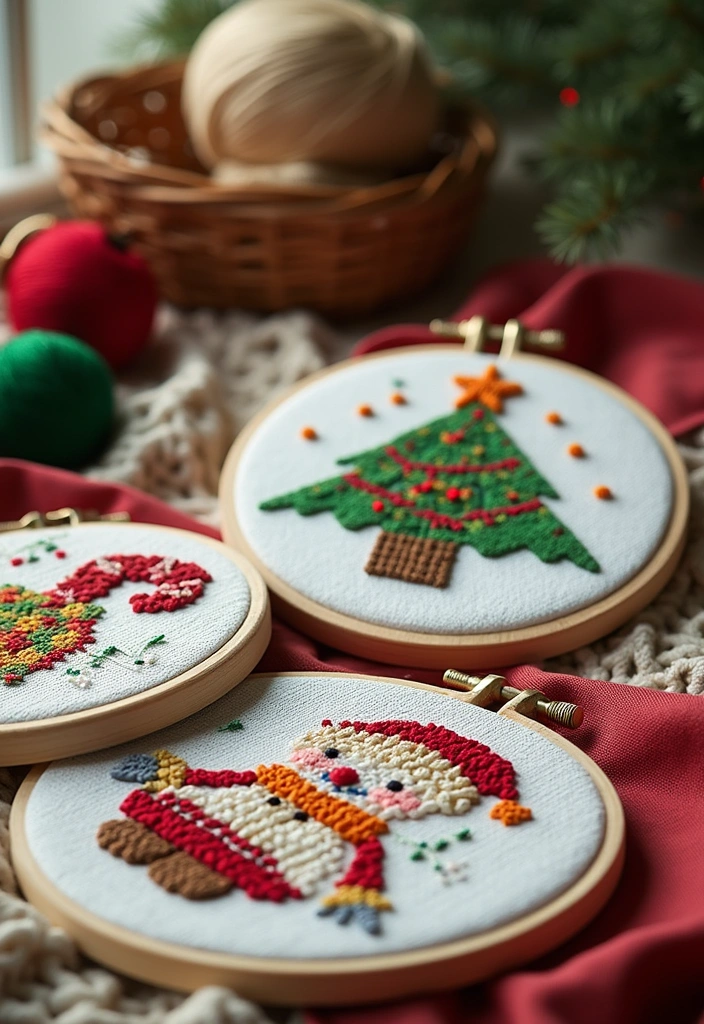
If you want a calm, cozy way to bring Christmas into your home, cross-stitch fits the bill. This simple craft grows with you and keeps your hands busy in a good way. Here is why it helps during a busy season.
1. Pattern and supplies Choose a pattern and the supplies. Pick a festive design like snowflakes, Christmas trees, or candy canes. Use fabric such as Aida cloth and threads in colors you love.
2. Keep it taut Keep the fabric taut. Slide the fabric into a tight embroidery hoop. Tight fabric helps even stitches and neat edges.
3. Finish options Finish options. When you finish stitching, frame it in a hoop or mount it on canvas. Tiny pieces can become ornaments or wall art.
4. Small ornaments Make small ornaments. Stitch mini scenes on two-inch squares or small hoops. Add a ribbon or hook to hang them on the tree.
Next steps: gather your supplies and start with a small design. These keepsakes bring holiday cheer for years. Take your time, and your stitches will glow.
21. Christmas Village Display
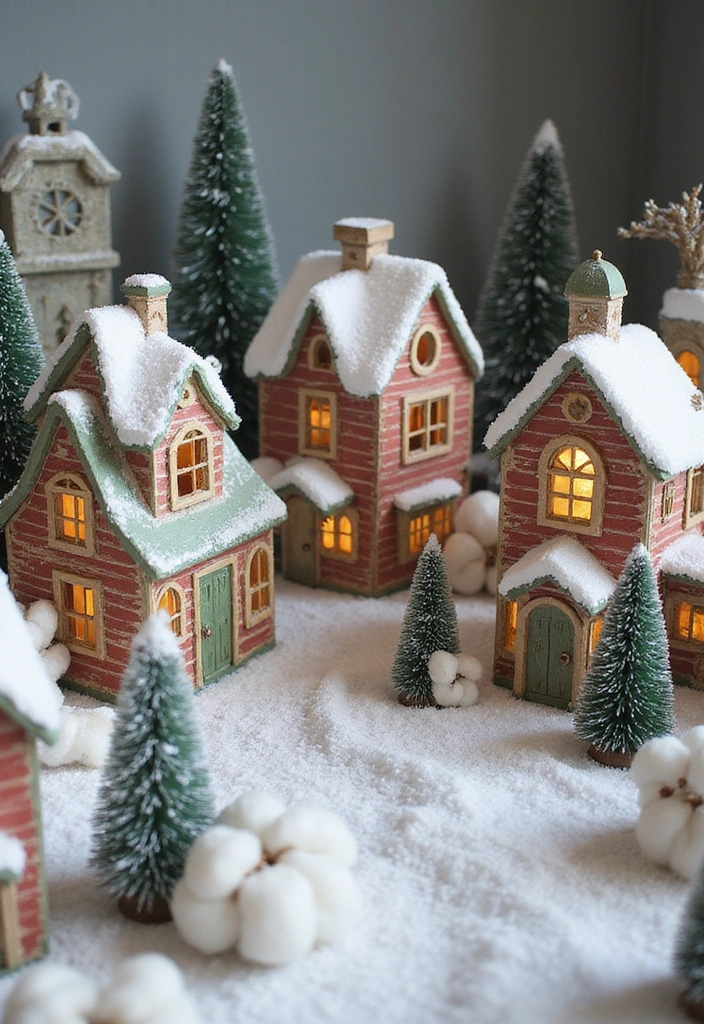
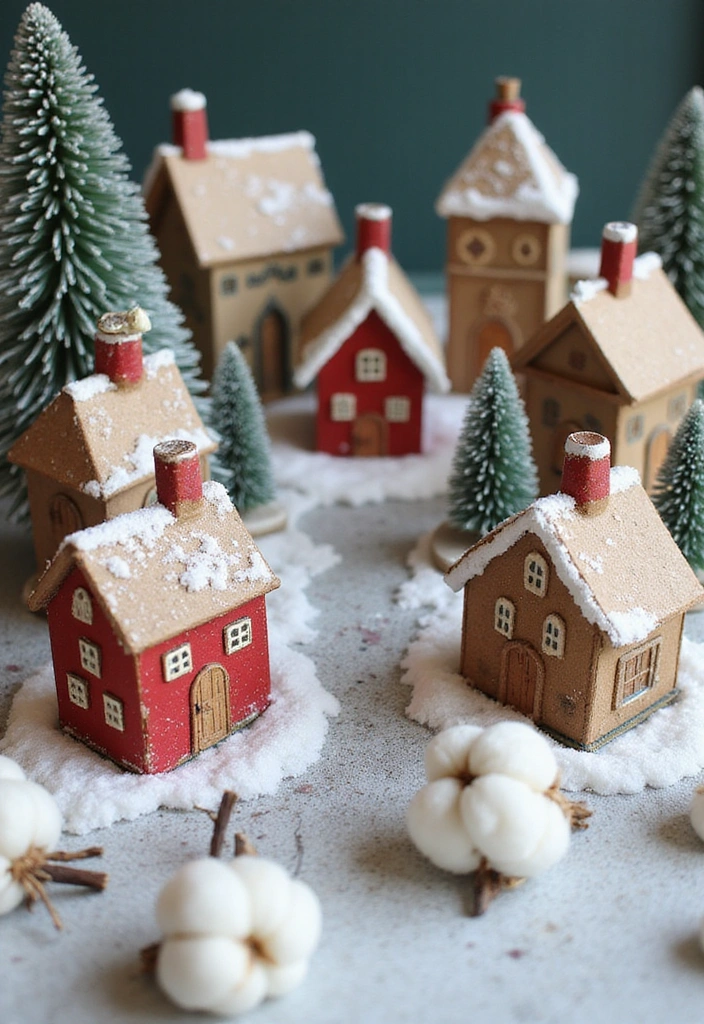
Want a cozy, hands-on Christmas display you can grow each year? A mini village brings the holiday into your home. It creates a warm scene on a table, mantel, or shelf and sparks stories as you add pieces.
– Build tiny houses from small cardboard boxes or wood crates.
– Paint them in festive colors like red, green, and snowy white.
– Add windows and doors with markers or paper cutouts.
– Create snow with cotton balls or white felt.
– Place miniature figures along snowy streets for life.
– Set up the village on a sturdy surface and light it with a small LED string.
– The warm glow makes the scene feel magical.
Starting is easy and costs little. You can start with three or four houses and grow it later. Swap in new accessories, like a bakery, church, or skating rink, as you collect bits over the years.
Here is how to make it extra special. Pick a simple color scheme, choose a theme for your village, and let kids add their own touches. This project stays flexible and kid-friendly, and it fits any holiday decor.
Next steps: gather boxes, craft paper, cotton, tiny figurines, and a string of lights. Decide where it will sit, then start building. Enjoy the process and watch your village come alive.
22. Holiday Countdown Calendar
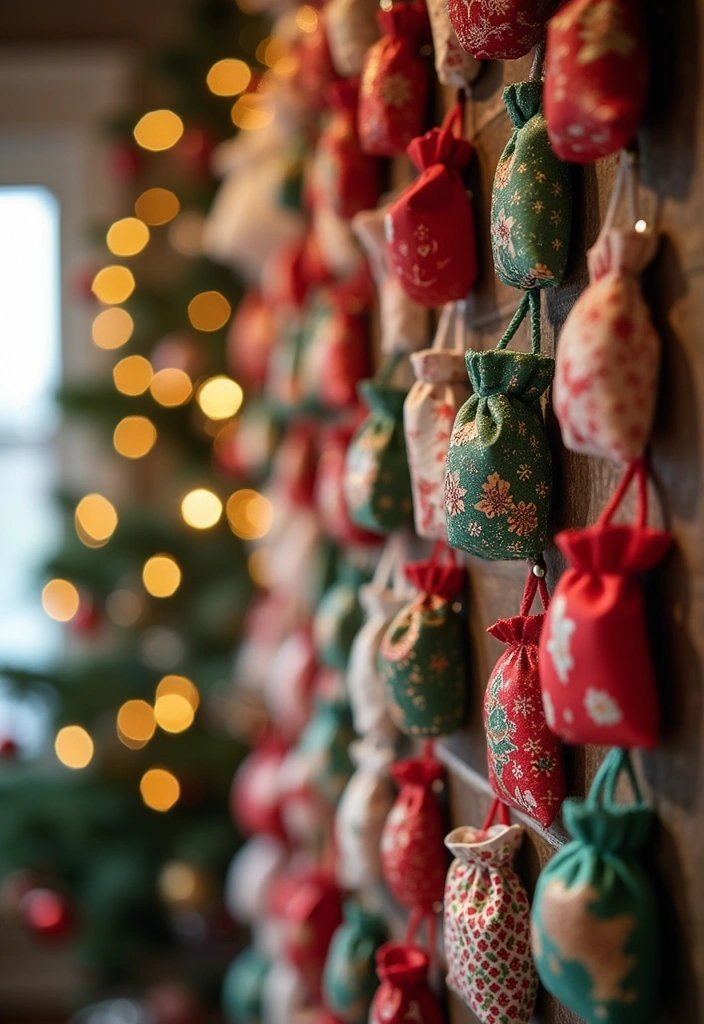
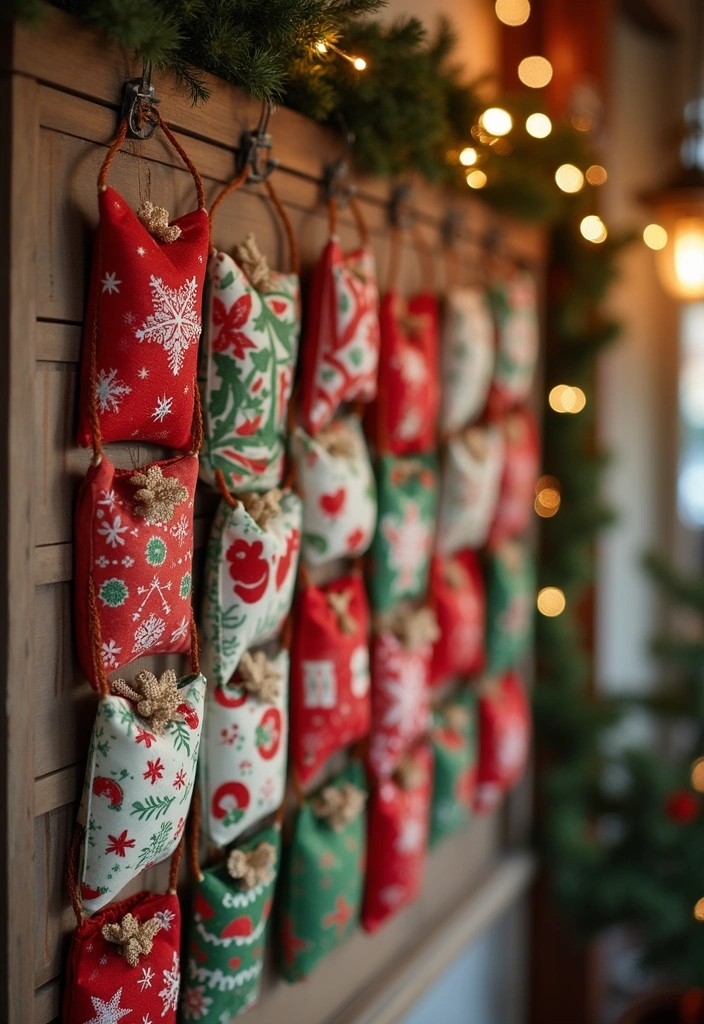
Do you want a simple way to bring daily cheer before Christmas? A handmade Advent calendar does that and more. It invites your family to pitch in. You can fit it to your space and budget. Here is why it works and how to start.
– Base: pick a small wooden board, a corkboard, or a fabric wall hanging. If you want an easy start, use a ready-made frame. A base about 8 by 10 inches fits most walls.
– Pouches: sew 24 pouches from fabric or decorative paper. Each pouch should be about 3 by 4 inches and can be arranged in a grid.
– Daily gifts: place a tiny treat, a note, or a mini toy in each pouch. Keep items light and simple so you can add new ones each day.
– Decor: paint the base in bright colors and add simple shapes like stars. Use ribbon or twine for texture, and sparingly add glitter if you like.
– Display: pick a visible spot like the kitchen wall or hallway. Hang the calendar where everyone can see it and open a new pocket each morning.
– Tradition: start December 1 and count down to December 24. Reuse the calendar next year with fresh numbers.
This craft creates warm moments and a shared holiday spirit without a big cost.
Conclusion

Crafting during the holiday season is a wonderful way to create lasting memories with friends and family. Whether it’s making decorations, gifts, or simply enjoying the process, these Christmas crafts will surely spread joy and cheer.
As you embark on your crafting journey, don’t forget to involve your loved ones and embrace the spirit of togetherness. Share your creations and let the festive spirit shine!
Frequently Asked Questions
What Are Some Easy Christmas Crafts I Can Do With My Kids?
Crafting with kids during Christmas can be a delightful experience! You might try making Festive Paper Ornaments, which are simple and colorful, or the Handprint Reindeer that turns a mess into a cherished keepsake. Both options are fun and promote creativity while being family-friendly!
What Materials Do I Need for the Christmas Crafts Listed?
Most of the Christmas crafts require common materials you likely have at home! For example, the Scented Cinnamon Ornaments only need cinnamon, flour, and water. Meanwhile, Recycled Christmas Cards can be made with old cards, scissors, and glue. Check the specific craft for a detailed list to gather what you need!
How Can I Make My Christmas Crafts More Personalized?
Personalization is key to making your Christmas crafts special! For crafts like DIY Christmas Wreaths or Holiday Photo Frames, you can incorporate personal colors, family photos, or even handwritten notes. This adds a unique touch that reflects your family’s story and style!
Are These Christmas Crafts Budget-Friendly?
Absolutely! Many of the Christmas crafts mentioned are designed to be budget-friendly and utilize materials you might already have at home, such as paper scraps, pinecones, and old Christmas cards. This makes them perfect for families looking to spread holiday cheer without breaking the bank!
What Is the Most Popular Craft in the Article?
While all crafts have their charm, readers have particularly loved the Holiday Mason Jar Gifts for their versatility and ease. They’re a quick, warm gift that looks lovely and can be tailored to suit anyone’s taste, making them a standout choice for spreading holiday cheer!
Related Topics
Christmas crafts
holiday decor
family-friendly
DIY projects
quick crafts
festive decorations
eco-friendly crafts
kid-friendly activities
homemade gifts
easy crafts
winter crafts
holiday spirit
Leave a Reply